The speedometer on my Opel Astra had taken to displaying random speeds a lot of the time and rather than replace the clock unit i decided it would easier, and more fun, to make some sort of display.
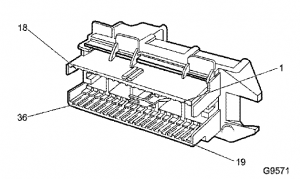
Being all electronic the clock unit only has one connector on the back with 36 pins which control all the gauges and warning lights.
Some googling later found a pinout for the connector and sure enough the speedo signal is a seperate input, as is the RPM input. I tapped into both of them and ran wires down to the centre console where i could work with them while being able to reassemble the car and drive it!
For the reference, the relevant pins are:
Pin 20, green wire, RPM Signal
Pin 27, blue/red, Speed Signal
Although it was the speed i was looking to display I figured it was more sensible to get a display working for the RPM first as this was something i could read while not moving!
Probing the signal with an oscilloscope I saw that the signal was a squarewave of varying frequency with a magnitude equal to the battery voltage. The dutycycle of the squarewave varied a bit around 50%.
As an initial test display i picked a TM1638 Display Module that i had bought from Deal Extreme. It’s very easy to use with an Arduino and the library from here.

The arduino does not have a function to measure frequency directly, instead it has a pulseIn() function which measures the time of either a high or low pulse. Assuming you have a consistent dutycycle you can calculate the frequency from this. In our case the dutycycle varies so we need to measure the high pulse and the low pulse and add them together to get the full period.
[code]
rpm_h = pulseIn(RPM_PIN, HIGH);
rpm_l = pulseIn(RPM_PIN, LOW);
rpm_period=(rpm_h+rpm_l);
[/code]
From the period we can calculate the RPM
[code]
rpm_freq = (1000000/rpm_period);
rpm = rpm_freq*30;
[/code]
And simply send it to the display
[code]module.setDisplayToDecNumber(rpm,0,false); // send rpm value to display[/code]
The argument to the function are:
rpm – the name of the variable we want to display
0 – which decimal points we want on, in this case none
false – whether we want to display leading zeros or not.
As a second feature i used the bi-colour LED’s to make a bargraph/shiftlight. Again, the library makes this very simple especially following the instructions of John at Tronixstuff
The entire code is available for download below and should allow for the display of the speed and RPM but it is untested as i’m working on a different means of displaying the information which i will write about in a different post.
[wpdm_file id=1]
HI there, I’m working on a similar project, I was wondering if you ever got the speed display working.
Unfortunately I also cannot see the download link that is mentioned at the bottom of the post.
Hi. Please make the code available would really appreciate it. Thank you. I know it is a long time ago.


You sir are a legend, your code has helped me alot. Thankyou