
Chet.ie
Electonics, Projects and Ramblings – Make it, break it, hack it, mend it.
January 14, 2013 — 11:06
For years our heating timer was sitting on the wall being not particularly useful. It was so awkward to reprogram new times into it that it had come to a point where it had a basic program on it and was mostly manually controlled by switching it on for 1/2/3 hours at a time. Finally i had enough of it and with some spare time on my hands i set about adding some remote control functionality to it. The first plan was to gain control over the “+hrs” button we were used to using and then see what was possible. In preparation i ordered an arduino ethernet shield but i wasn’t sure what i was going to do with it.
A popular method of controlling a switch with a microcontroller is to replace it with a transistor. As i didn’t want to interfere with the normal operation of the switch i traced back the pads on the switch to two vias on the PCB which allowed me to solder some thin wires in to attach the transistor to. To test i brought out GND and the base wire and reassembled. Running some simple code to toggle the switch let me cycle through the times and turn it off as expected.
While deciding what to do next i was experimenting with the controller and trying to see if there was any information being passed from the (marked) UART on the board. I think i overstressed the ribbon cable attaching the two PCB’s at this point and caused a short somewhere as the controller died on me and i couldn’t find a fault or come up with any easy solution to make it work.
Typically this was just coming up on the weekend and it was getting cold! As a quick fix i installed a mains switch for the heating but it quickly became clear that that was not going to work as a long term solution. The original controller was nothing more than a relay connecting the live of the mains to the heating boiler, nothing too complicated about replicating that right?
I knew my brother had a spare solid state relay which simplified switching the mains as i could run that directly from a 5v output. I dug into stash of bits to use and came out with an arduino nano, a bluetooth serial module, an i2c real time clock module and an i2c 16×02 lcd.
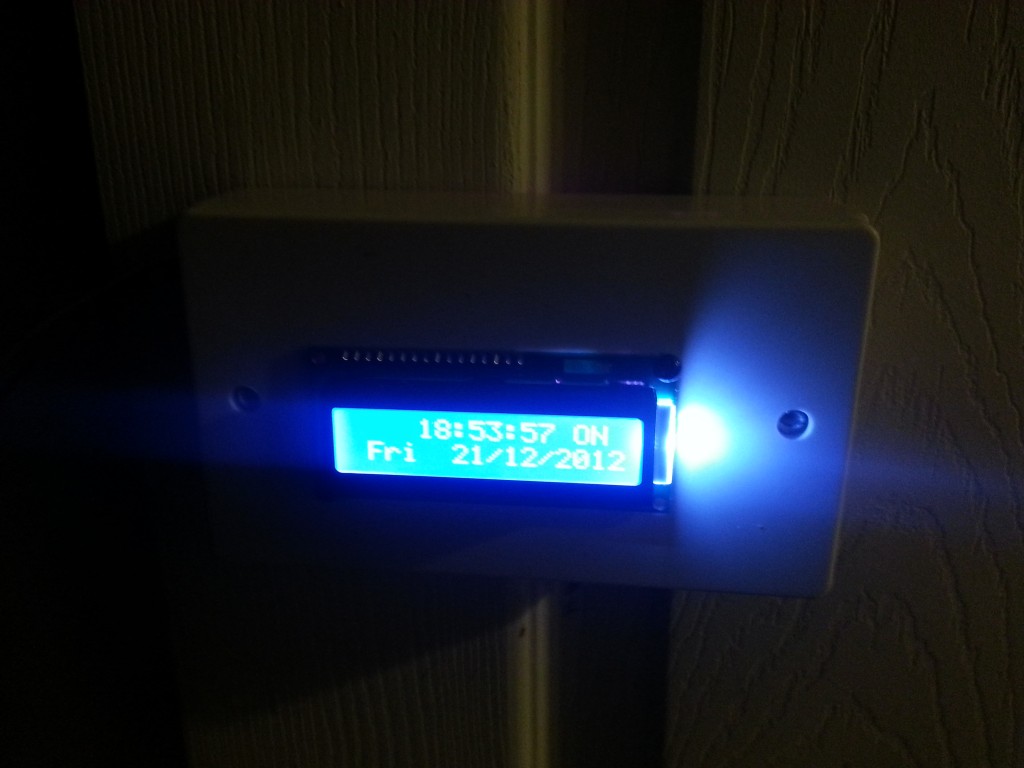
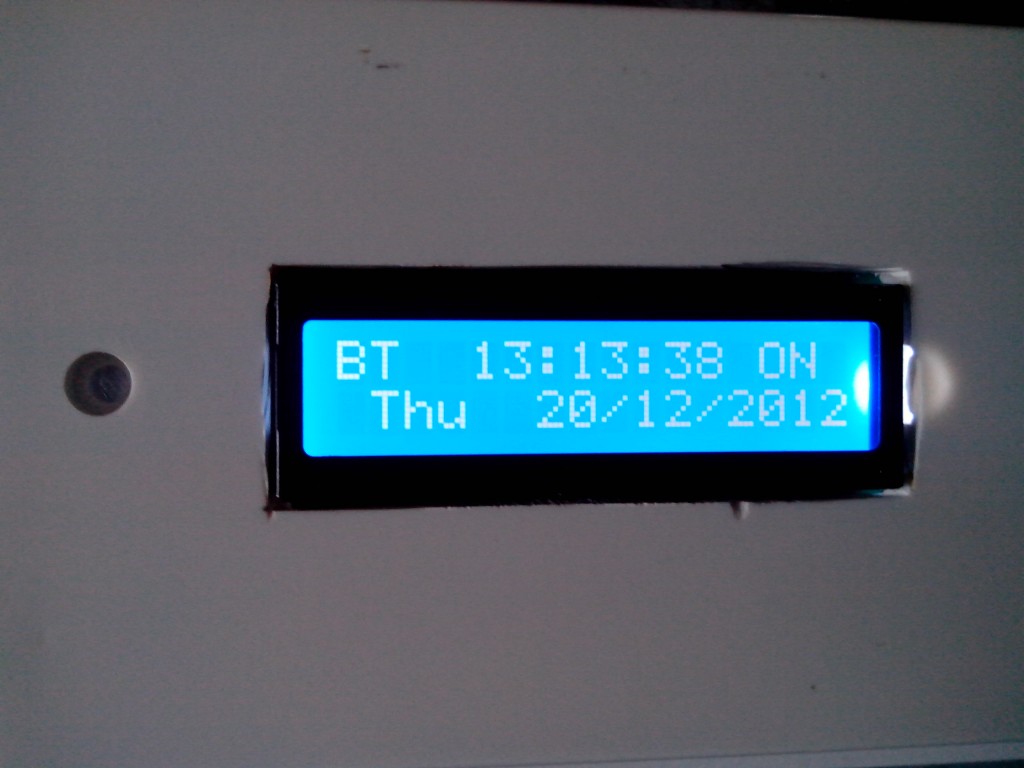
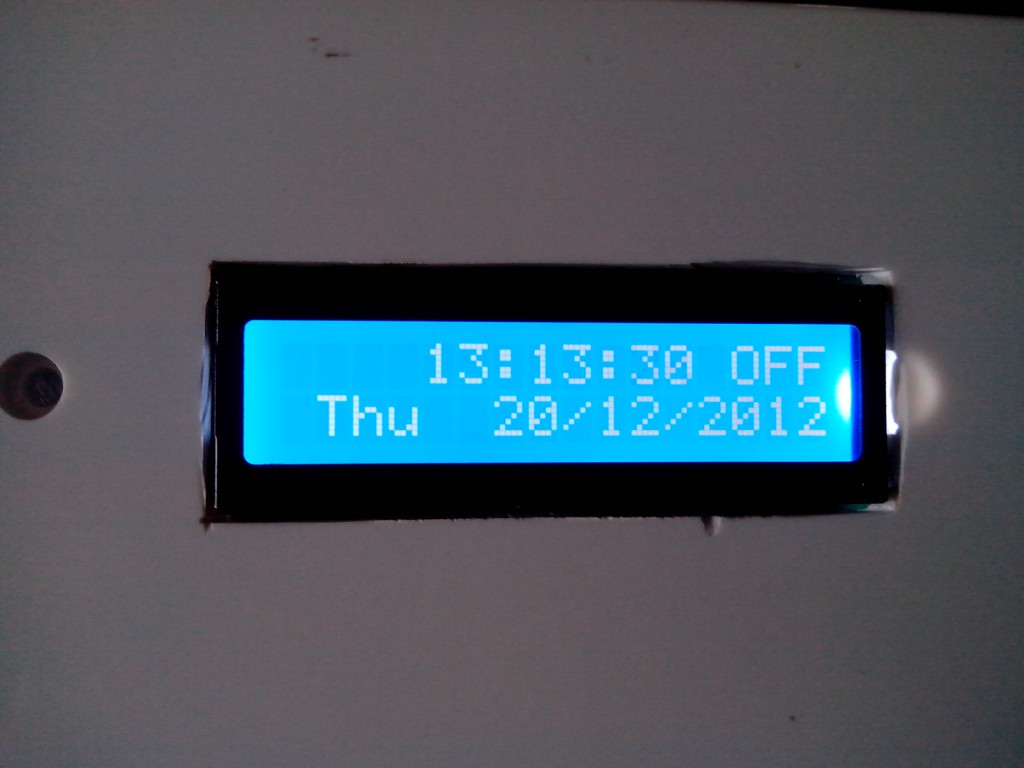
The most awkward thing to code was a menu system for setting the heating times, so i didn’t 🙂 I hardcoded the times and put in a manual override via bluetooth. I picked up a double gang box and blanker in the local hardware and mounted the LCD in it. As soon as my wife seen it she told me i wasn’t allowed “put that jumble sale of a thing on the wall” :/ I quite liked the homemade look!
To power the controller i took apart an old USB charger and mounted that in a second two gang box in the hall cupboard. I kept the usb connection as i already had the male connector from testing the USB boost modules In this pic you can see the mains come in and go back out via the solid state relay and also the 5v power supply going out by the thin red and black wires. The white wire is from the controller to the relay.
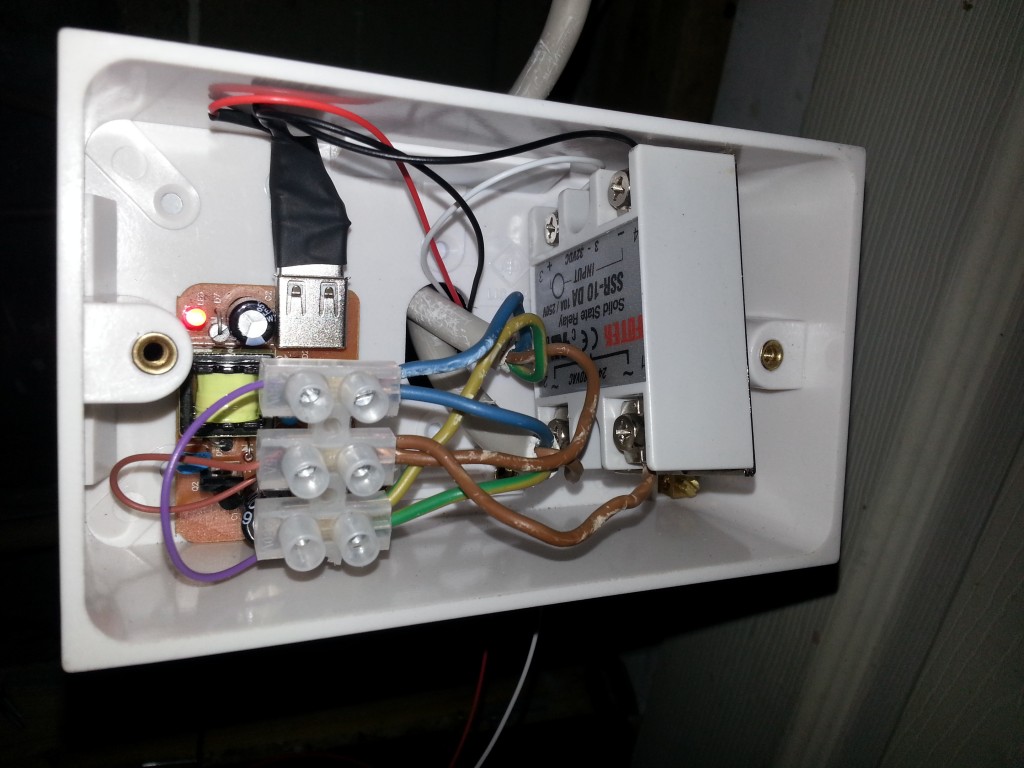
The controller itself was mounted on the inside of the door for easy access but where my wife didn’t have to look at it!
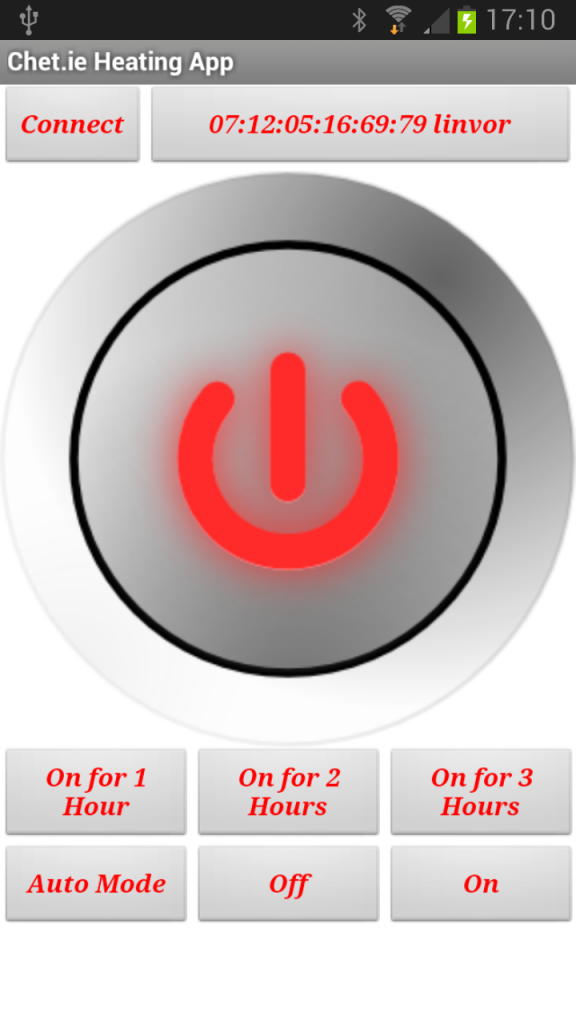
Over the next few days i tweaked the software to add extra features, the hardest to get working correctly was the +1/2/3 hour modes, especially as i had to wait around to see if it was definitely working! Here is a screenshot from the final android (app inventor) app, it uses my usual method of sending single bytes to perform each action. Along with sending serial commands the controller also outputs it current on/off status which is read by the phone and changes the state of the large power icon in the middle which allows you to quickly connect and check if the heating is on or not.
Here is the complete arduino code for the controller
[code]
/*
Chet.ie Heating Controller Sketch
*/
/*
Mode codes:
a – auto (timer)
f – manual off
o – manual on
1 – on for one hour, then auto
2 – on for two hours, then auto
3 – on for 3 hours, then auto
*/
#include <SoftwareSerial.h>
#include “Wire.h”
#include <LiquidCrystal_I2C.h>
#define DS1307_I2C_ADDRESS 0x68
#define FIRSTON 4
#define FIRSTOFF 9
#define SECONDON 16
#define SECONDOFF 22
SoftwareSerial mySerial(10, 11); // RX, TX
boolean heatingOn = false;
int mode = ‘a’;
int ethstatus = 0;
int relayPin = 13;
int offHour, offMin = 0;
int usePlustime = 0;
int lastmode = 0;
LiquidCrystal_I2C lcd(0x27,16,2); // set the LCD address to 0x27 for a 16 chars and 2 line display
// Convert normal decimal numbers to binary coded decimal
byte decToBcd(byte val)
{
return ( (val/10*16) + (val%10) );
}
// Convert binary coded decimal to normal decimal numbers
byte bcdToDec(byte val)
{
return ( (val/16*10) + (val%16) );
}
// Gets the date and time from the ds1307
void getDateDs1307(byte *second,
byte *minute,
byte *hour,
byte *dayOfWeek,
byte *dayOfMonth,
byte *month,
byte *year)
{
// Reset the register pointer
Wire.beginTransmission(DS1307_I2C_ADDRESS);
Wire.write(0);
Wire.endTransmission();
Wire.requestFrom(DS1307_I2C_ADDRESS, 7);
// A few of these need masks because certain bits are control bits
*second = bcdToDec(Wire.read() & 0x7f);
*minute = bcdToDec(Wire.read());
*hour = bcdToDec(Wire.read() & 0x3f); // Need to change this if 12 hour am/pm
*dayOfWeek = bcdToDec(Wire.read());
*dayOfMonth = bcdToDec(Wire.read());
*month = bcdToDec(Wire.read());
*year = bcdToDec(Wire.read());
}
void lcdOutput(byte second,
byte minute,
byte hour,
byte dayOfWeek,
byte dayOfMonth,
byte month,
byte year)
{
lcd.setCursor(0,0);
if(mode==’o’){
lcd.print(“on “);
}
else if(mode==’f’){
lcd.print(“off “);
}
else if(mode==’1′){
lcd.print(” +1 “);
}
else if(mode==’2′){
lcd.print(” +2 “);
}
else if(mode==’3′){
lcd.print(” +3 “);
}
else {
lcd.print(“Aut “);
}
if (hour<10)
{
lcd.print(” “);
}
lcd.print(hour, DEC);
lcd.print(“:”);
if (minute<10)
{
lcd.print(“0”);
}
lcd.print(minute, DEC);
lcd.print(“:”);
if (second<10)
{
lcd.print(“0″);
}
lcd.print(second, DEC);
lcd.print(” “);
if(heatingOn == true)
{
lcd.print(“ON “);
}
else
{
lcd.print(“OFF”);
}
lcd.setCursor(0,1);
if(usePlustime){
lcd.print(” ON UNTIL “);
if (offHour<10)
{
lcd.print(“0”);
}
lcd.print(offHour, DEC);
lcd.print(“:”);
if (offMin<10)
{
lcd.print(“0″);
}
lcd.print(offMin, DEC);
lcd.print(” “);
}
else{
lcd.print(” “);
switch(dayOfWeek){
case 1:
lcd.print(“Sun”);
break;
case 2:
lcd.print(“Mon”);
break;
case 3:
lcd.print(“Tue”);
break;
case 4:
lcd.print(“Wed”);
break;
case 5:
lcd.print(“Thu”);
break;
case 6:
lcd.print(“Fri”);
break;
case 7:
lcd.print(“Sat”);
break;
}
lcd.print(” “);
lcd.print(dayOfMonth, DEC);
lcd.print(“/”);
lcd.print(month, DEC);
lcd.print(“/20″);
lcd.print(year, DEC);
}
}
void setup()
{
pinMode(relayPin, OUTPUT);
byte second, minute, hour, dayOfWeek, dayOfMonth, month, year;
Wire.begin();
mySerial.begin(9600);
lcd.init(); // initialize the lcd
lcd.backlight();
lcd.setCursor(0,0);
lcd.print(” www.Chet.ie”); // print text and move cursor to start of next line
lcd.setCursor(0,1);
lcd.print(“Heating Control”);
delay(5000);
lcd.clear(); // clear LCD screen
}
void loop()
{
if (mySerial.available() > 0)
{
// get incoming byte:
mode = mySerial.read();
}
byte second, minute, hour, dayOfWeek, dayOfMonth, month, year;
getDateDs1307(&second, &minute, &hour, &dayOfWeek, &dayOfMonth, &month, &year);
if((usePlustime == 1)&&(hour == offHour)&&(minute == offMin))
{
usePlustime = 0; //not using plus time anymore
mode=lastmode; //switch back to auto mode
}
if((mode==’a’)){
usePlustime = 0;
lastmode=mode;
if((hour>=FIRSTON)&&(hour<FIRSTOFF)){
heatingOn = true;
}
else if((hour>=SECONDON)&&(hour<SECONDOFF)){
heatingOn = true;
}
else{
heatingOn=false;
}
}
else if((mode==’o’)){
usePlustime = 0;
heatingOn=1;
lastmode=mode;
}
else if((mode==’f’)){
usePlustime = 0;
heatingOn=0;
lastmode=mode;
}
else if((mode==’1′)&& (lastmode!=’1′)){
offHour = (hour+1);
offMin = minute;
usePlustime = 1;
heatingOn=1;
lastmode=mode;
}
else if((mode==’2′)&& (lastmode!=’2′)){
offHour = (hour+2);
offMin = minute;
usePlustime = 1;
heatingOn = 1;
lastmode=mode;
}
else if((mode==’3′)&& (lastmode!=’3′)){
offHour = (hour+3);
offMin = minute;
usePlustime = 1;
heatingOn = 1;
lastmode=mode;
}
if(offHour>=24){
offHour=offHour-24;
}
lcdOutput(second, minute, hour, dayOfWeek, dayOfMonth, month, year); // print to LCD screen
mySerial.println(heatingOn);
if(heatingOn == true)
{
digitalWrite(relayPin, HIGH);
}
else if(heatingOn == false)
{
digitalWrite(relayPin, LOW);
}
delay(1000);
}
[/code]
The android APK can be downloaded here:
[wpdm_file id=4]
This has been replaced now (v2 post coming soon) and due to my phone dying i have no pics of the internals, it was only temperarily put together on a breadboard anyway. If you have any questions on the wiring jut ask in the comments.
Comments:
[…] on from my previous post on my DIY timer I wanted to make something that I could mount to the wall and not have my wife be ashamed of it! […]